Showing posts with label mural. Show all posts

Friday, May 10, 2013

My latest mosaic installation - a stem!

This latest piece was a lot of fun to do. The client was clear and concise about what she wanted and where it was going to go and then she let me do my thing! That is the way I hope all my clients are! 
This client has a very whimsical and beautiful back yard. She even has a koi pond and two tortoises. On this particular wall she had already hung a large metal flower sculpture and wanted a mosaic stem to finish it off with a flourish. And so, that's what I gave her.
The space for the mosaic measured approximately 4 ft x 7 ft. I designed the "stem", printed it out and taped it together, cut it out and then taped it up to be outlined onto the wall.
I had already created the pieces on Wediboard in my studio so it was just a matter of adhering them to the wall. Here it is, pre-grouting.
The next day was grouting day. Here is the design taped off to protect the newly-painted wall. Prep for grouting is my least favorite part of a mosaic mural installation. Just sayin'! I kept asking myself "why did you design a spiral? Why? Why?"
But alls well that ends well and this came out very well, I think! Here are some detail shots.
And here it is finished.
Mosaic Stem Installation
7 feet tall
Glass and tile

Wednesday, February 6, 2013

River of Life Mosaic Project Begins

This is the third mosaic project I have led at the Unitarian Church of Berkeley, California. These folks are getting to be real pros at this!
 The theme for the latest mural is River Of Life. I was offered a second story wall over a breezeway area that is approximately 247 square feet. As you can see in the picture, there are stairs on the right side. So I designed the "River" to begin up in the left hand corner and trail off down to the right hand lower corner. I will be working on scaffolding. Not my favorite thing but I have done it before and this scaffolding has stairs and is very sturdy.
The Co-Ministers, Barbara and Bill Hamilton-Holway, wanted to do a series of sermons on spiritual practice. Their theme was "8 Stepping Stones on the Spiritual Journey: Show Up, Practice, Grow, Serve, Go Forth, Give, Create and Love". And therefore there are 8 stones in my river design.
 A simple idea and a simple design. But I knew I wanted to challenge this congregation with a little more difficult production than last time. I wanted to make the leaf-making for the Tree of Life mural seem like arts and crafts. The total size of the design is about 110 square feet. I always design on my computer and have it printed out full size. The above picture a partial view of the art. Each section is labelled, numbered and named. For this project I cut each section out, prepared it for mosaicking on mesh and arranged each section by color. Below is a photo of the pile of pieces ready to go:
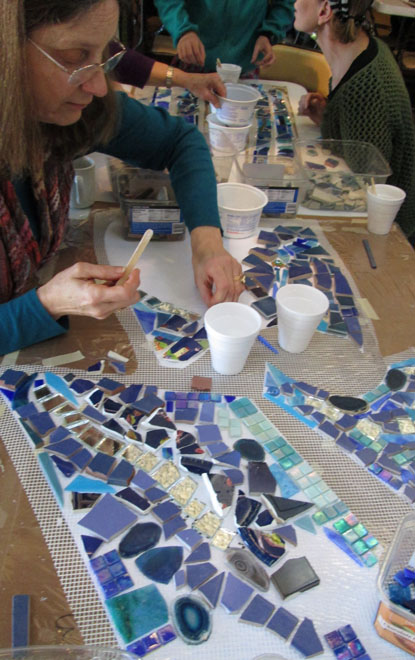
The congregation had again donated all kinds of tessarae for this project. And it was my job to divide them up by color and texture and call out which colors would go on which sections of the mural. Each box, in photo below, is labelled to correspond by color with specific  sections of the mural.
So far there there have been two workshops - each held after the Sunday service. This Sunday is the last one and I only have a few odds and ends for them to finish. 
My goal was to have people working together on these larger pieces - using only the tessarae that was right in front of them. People worked shoulder to shoulder. I wanted to control the flow and blending of the color of the "water" as it flows down and around the "rocks". 

 This is a TOTAL experiment for all of us - me included. When these pieces are cut apart and worked on separately, it is very hard to know if my idea is coming together or not. So I have to rely my organizing skills and then just move ahead on a wing and a prayer! Here are the finished pieces, cut apart, organized by section and ready to be installed:


I am also making mosaic pieces myself out of the more special tessarae, like jewelry, watches, rings, gemstones, etc.


All in all there might be about 90 sections I will be installing. It sounds daunting but I am excited to get started and to see if my vision of this mural can come true!


Wednesday, May 14, 2008

Mosaic Butterflies

I just did my first installation in a long time. I had forgotten how much fun it is. The day was hot and sunny and I was dirty and sweaty. I love working under those conditions! My hands are all cut up from working with the glass and still stained midnight blue from the grout.
I have a 70 foot long cement wall that runs the length of my backyard. The cement is lumpy and bumpy and was poorly made from the beginning. I have wanted to mosaic it but it always looked like it would be a tremendous investment in time and materials. Also, I like working in glass and I just couldnt see a way to directly mosaic onto that wall. So I came up with a plan. I decided to cut individual pieces out of Hardiboard, mosaic them in my shop and then cement them to the wall - leaving only the grouting to be done on site. I don't know if this is simply reinventing the wheel and millions of people do it this way every day but for me it was an experiment.
I figured: what the heck,
it's my wall!Here is a picture of the wall. This isnt even half of it but you may be able to see the roughness of it. I had to use a very thick coating of Thinset in places to make the work area as flat as possible. Again, maybe it isn't kosher to use Thinset in a place where traditional cement would be used but Thinset IS pretty cement-like so I figured why not. Here is the first butterfly stuck to the wall. You can see the chalk outlines I did to get an idea how they would fit next to each other. It was somewhat messy looking because I had used white Thinset and it stood out like a sore thumb. Not good. I bought grey Thinset for the next butterfly and "painted" over the white that showed around the first one too. Much better. This picture shows the length I had to go to keep the second butterfly in place! Tape and plywood wedged against it for hours did the trick pretty well.Here they are drying.And here they are finished. Not perfect by a long shot but I guarantee I will become perfect! I had been so nervous to try this because once it's done, it's immovable! But I had totally forgotten how much fun it is! I am working on a frog to go on the wall next and have all kinds of ideas for more pieces. I'll keep you posted.