Thursday, October 21, 2010

3D Mosaics

A few weeks ago I ventured into trying my hand at 3D cement sculpture. My intent was to create sculptures as substrates for a mosaic. In the photo above are a couple of large mushrooms and a cat
I made as my first 3D attempts.

The cat measures 16" wide x 31" tall.
The armature for these is styrofoam (insulation from Home Depot. $19 for a huge sheet) cut and glued/taped into a rudimentary shape.
The next step is just like papier mache only using a slurry of cement (instead of flour) and water. Fiberglass mesh, cut into strips, is dredged through the slurry and wrapped around the styrofoam armature until a close rendition of the final shape is achieved. Once that is dry (24 hours or so) a layer of concrete creates the smooth "skin" of the piece.
I learned in this process that fine sand, rather than coarse,
is the way to go when mixing the concrete!

In the pictures you will also see mosaics on rebar that I am calling "popsicles" for lack of a better word. I describe them in more detail in the following post.

Green Mushroom
Cement and tile
15" wide x 19" tall
Fall 2010

Blue Mushroom
Cement and tile
15" wide x 27" tall
Fall 2010

Green Mushroom in situ
with
Butterfly popsicle

Blue Mushroom in situ
with
Sunflower and Saint popsicles

More substrates waiting!

Latest Work Aug/Oct '10

Hello again! As you can tell by the date of my last post, I havent written much lately. I have been working on new - for me - ideas.
First, I took the summer off to take a driving trip around the Southwest.
I love it there and we just meandered around,
camping and being off the grid - sort of.

But by the end of the summer I really wanted to get back to work.
I get really depressed if I dont have projects.

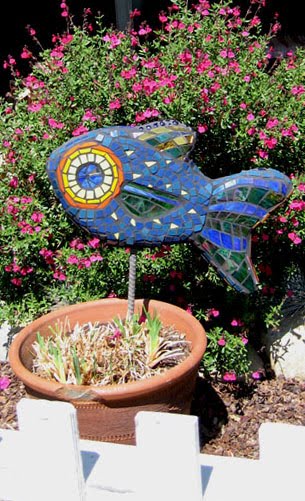
I love 3D mosaics, especially large sculptures. So I tried my hand at what I am calling "popsicles." They are shapes cut out of styrofoam, skewered on a 1/2" rebar, covered with fiberglass mesh and cement slurry, then finished with concrete. Then I used these as
substrates for mosaics. Some have the same mosaic
pattern on both sides, some are different on both sides.

These are my first attempts and are extremely imperfect.
But I am definitely on a path toward 3D mosaics and I love that!
Its a steep learning curve though.


Butterfly (popsicle)
18" wide x 16" tall x 3" deep
Stands 35" approx.
Fall 2010


Fish, side 1 (popsicle)
24" wide x 16" tall x 3" deep
Stands 28" approx.
Fall 2010


Fish, side 2 (popsicle)
24" wide x 16" tall x 3" deep
Stands 28" approx.
Fall 2010

Frog, side 1 (popsicle)
21" wide x 36" tall x 3" deep
Stands 51" approx.
Fall 2010


Frog, side 2 (popsicle)
21" wide x 36" tall x 3" deep
Stands 51" approx.
Fall 2010

Sunflower (popsicle)
20" wide x 27" tall x 4" deep
Stands 37" approx.
Fall 2010


Sunday, May 23, 2010

Jingletown's Open Studios June 5, 6 & 12, 13 2010

It's time again for Open Studios in Jingletown - the East Bay's coolest art's community. Located on the Oakland Riviera, off of 880 between the Park Street and Fruitvale Bridges, Jingletown is a homey little community with a lively art scene. This June over 25 artists will be showing everything from jewelry and photography to painting and mosaics. Come for the art, stroll around to see even more art! The streets are positively littered with mosaic murals. Stop in at the 4:20 Gallery where I will be showing these new pieces. They are a departure for me in that I am experimenting with mixing the strict lay patterns of hard tile with the more intuitive flow of glass.
"Saint"
30" x 56"
Tile and glass
2010

"Vase"
27" x 47"
Tile and glass
2010"Southwest Pastiche"
17" x 36"
Tile and glass
2010"Koi"
16" x 32"
Tile and glass
2010"Frog on Leaf 1"
31" x 15"
Tile and glass
2010"Frog on Leaf 2"
28" x 15"
Tile and glass
2010

Institute of Mosaic Art Changes Hands

So IMA has been sold.
I wish the new owner all the best to create IMA to be a place of
beauty, peace and light, where all people will be treated
with respect and dignity.
We look forward with hope to see IMA become a
good neighbor, not only in Jingletown
but in the larger Northern California mosaic community.

Thursday, March 18, 2010

Virgin of Guadalupe Mosaic Mural Installation

I absolutely love creating mosaic murals and installing them.
It's hard work and totally worth it!
The Jingletown neighborhood in Oakland California has
a new mosaic mural! I am in the process of completing my latest mosaic, the Virgin of Guadalupe. She is 7' x 4' on a wall space that is approximately 10' x 10' and is made of ceramic tile, glass and mirror.
This mural is the first piece in a larger art project:
the Peterson Street Art Wall & Garden.

Jingletown is a neighborhood in Oakland that is dealing with gang violence and graffiti.
It is also one of the fastest growing arts neighborhoods in the Bay Area
with many artists studios and live/work lofts.

There is a very long wall on Peterson Street, down from the 4:20 Gallery, that is a tempting space for defacement by the neighborhood gangs and their rivals. But the artists in the 'hood came up with a graffiti-abatement plan that will also beautify and
uplift the area: let the neighborhood artists install art on the wall.
This is about one half of the wall looking west.

Before:

After:

The wall is naturally broken into 20 panels of about 10' x 10' each. Any Jingletown artist can submit an idea and then carry it out themselves.

The first image was to be the Virgin of Guadalupe because of the Latino heritage and influence in Jingletown. It is hoped this image - because of her power as a religious and cultural icon - will slow the tide of gang violence and the graffiti problems.

The first step, as always, was to transfer the image onto the wall by taping up the paper pattern and outlining it with chalk or a marker. Since this is an oval shape with a definite center line, it had to be placed perfectly or it would have been noticeably "off".

Then the fun begins.

The pieces are fit together one after another like a jigsaw puzzle and held in place with tape until the Thinset has hardened somewhat.

This process of "building" the mosaic took two of us 4 hours to complete.

The next day we taped around it in preparation for grouting.
This was one of the easiest tape jobs I have done on my work since it is basically an oval shape!
The grouting took two of us another 4 hours to complete.
Here I am with the mural after the grouting was complete.

The next day I painted the section of wall around the mural.

One of the most wonderful things about installing a mosaic is how people will stop by on their walks or in their cars and comment, give a thumbs up, ask questions or just to watch for a while. I find mosaic work to be very solitary so it really feels great to get good feedback and supportive attention from the public.

The Virgin of Guadalupe is often associated with the constellation Virgo so the next step will be to add mosaic stars around her to give it a more finished look.

Some close-ups:


The lore of the Virgin of Guadalupe is very interesting. Learn more HERE.

I have to thank my good friend and excellent assistant Saundra Warren for helping me again. Saundra is also a mosaic artist and a tile maker. Take a look at her website In Saundra's Garden.

The Virgin Of Guadalupe (in progress)
Peterson Street between Ford and Chapman
Jingletown, Oakland, CA
March 2010
Ceramic tile, glass and mirror
7' x 4' on a 10' x 10' section of wall

Please read more about the Peterson Street Art Garden in the San Francisco Examiner.

Mosaic Backsplash

More mosaics around the house!
This kitchen mosaic measures approximately 25 square feet in total. It begins over the sink and counter, extends to walls around the stove and ends in a small bar area. I kept with the theme of vines and dragonflies because, I figure, why not!
The project began with the demolition of the existing tiles.

I didnt know what condition the wall behind them would be in.
This is an old house and the existing walls are lath and plaster.
The demolition took it's toll on the plaster.

I then covered the wall with Easyboard simply screwed into the existing boards.
Next step was to adhere the glass mosaic pieces and tape them in place to dry.

I cover everything with tarps to protect the area and for easy clean up.

This installation uses a combination of traditional tiling and broken tile mosaics.


Here it is finished.

After the sink backsplash was finished I moved on the the stove area. The same procedures took place: demolition, tape the vines and insects to the wall to dry then mosaic around them.

The first piece of this mosaic is a small bar area where I used very dark blue tiles.

For the rest of it I used a lighter greyish-blue color with purple flecks. This way there is a continuity in the color scheme but without being overwhelmingly one color.

Here is the stove area finished:

Here are close-ups of the finished piece:

Kitchen Mosaic for private residence
March 2010
25 square feet total

Monday, March 8, 2010

My Mosaics In The News

Here is a little bit of fun.
For this week I am the Oakland Artist of the Week on Oakland Local, a website about the arts and events in Oakland, Ca. This feels good!
http://oaklandlocal.com/daily-image/oakland-artist-kim-larson