Showing posts with label garden art. Show all posts

Friday, May 10, 2013

My latest mosaic installation - a stem!

This latest piece was a lot of fun to do. The client was clear and concise about what she wanted and where it was going to go and then she let me do my thing! That is the way I hope all my clients are! 
This client has a very whimsical and beautiful back yard. She even has a koi pond and two tortoises. On this particular wall she had already hung a large metal flower sculpture and wanted a mosaic stem to finish it off with a flourish. And so, that's what I gave her.
The space for the mosaic measured approximately 4 ft x 7 ft. I designed the "stem", printed it out and taped it together, cut it out and then taped it up to be outlined onto the wall.
I had already created the pieces on Wediboard in my studio so it was just a matter of adhering them to the wall. Here it is, pre-grouting.
The next day was grouting day. Here is the design taped off to protect the newly-painted wall. Prep for grouting is my least favorite part of a mosaic mural installation. Just sayin'! I kept asking myself "why did you design a spiral? Why? Why?"
But alls well that ends well and this came out very well, I think! Here are some detail shots.
And here it is finished.
Mosaic Stem Installation
7 feet tall
Glass and tile

Wednesday, December 12, 2012

The Buggy Garden Mosaic

I am currently finishing a commission for Hug A Bug Preschool in El Cerrito, California. Here I just have to stop and show you the breathtaking view of San Francisco from their front door!! 
 I was asked to create this piece to commemorate their 30th year in business. On November 17th I led a group of 15 parents in a mosaic bug making workshop held on-site. They were each asked to bring little pieces that reminded them of childhood - or in some way were special to them - to incorporate into their "bug". This was a wonderful and warm event held on a grey and drizzly Saturday morning.
 I designed several different insects - like butterflies, dragonflies, bees and even an inchworm! I mounted them so the "artists" would be gluing their tessarae onto mesh. 
 Afterward, I took the mosaic bugs home to dry. In a few days I mounted each one onto a lightweight substrate called Easyboard. (I used the last of my stash because it is no longer being made.)
 I knew that my design idea would be a simple one - a garden with bugs and flowers. I really like the work of the artist Hundertwasser so I allowed myself to be influenced by the psychological freedom that his art expresses. 
 The finished size of this is 6' x 3' so I split the design in half and used the mesh method to create it in my studio. The usual types of flowers didnt interest me for this "garden" so I just went with my own vision of "flowers" instead. I created them on a substrate (Easyboard again) to give them depth. I envisioned the large middle one first. In this photo, it is on the right. I "saw" a lollipop-like spiral in red and white.  
 While I created that flower, the vision of the next two, on either side of it, came into my head, with three petals each and stripes on one but checkerboards dominating the other. Nancy, the head of Hug A Bug, asked me to incorporate some small figurines into each flower so I did that too - you can see some of them here. And after those were finished, the last two flowers were created - rounding out my design.
There is nothing like the first time you lay out your mosaic as a whole piece to get a good look at it.
The next step? Installation.

Sunday, December 19, 2010

"Cat In Tall Grass" Mosaic Sculpture

 Continuing my newfound interest in sculpting for mosaics 
is my latest one: "Cat In Tall Grass".


This guy is 32" tall. My initial vision was to mosaic him totally in purple glass. I love the effect of that particular color because it appears to be black until you get in into the right light. I think of it as a metaphor for so many things: you can't see it until you really look! I like much of my mosaics to be that way. You only really see them when you take time to linger and look. 


 As it turned out, I already had on hand a lot of green glass but only a little purple. So I rethought my design and decided that this guy would be hiding in the grass. He even has a bee buzzing around the back of his head!


I initially set out to create a pleasing shape that had 
popped into my head. I pretty much achieved it!

Here he is, in situ.

Cat In Tall Grass
December, 2010
Cement sculpture with glass and mirror mosaic
32" tall x 44" around x 16" wide

Tuesday, November 30, 2010

Mosaic Rooster Sculpture

I have spent the past few months learning to create cement sculptures for mosaics.
This rooster is my masterpiece so far!

He has movement and personality. Instilling those qualities into a
cement piece isnt easy. 

But diligence and practice makes perfect. Or sort of perfect.
The basic armature of all my 3D shapes has been 

styrofoam from Home Depot.
For this guy, I cut out basic shapes - for both depth 

and width - and taped them into place. The next step was to cover this 
with fiberglass mesh dredged through a slurry of cement and water. 
 The piece started to come into focus at that stage.

But the final perfecting was done with cement and Darjit. 
(Darjit is a "green" product
made of paper
that makes the cement more maleable.)
For the mosaic finishing phase I used what I had in my 
studio - glass and mirror and some marbles. Pretty simple tessarae. 
But there are many tricks to be learned about how to mosaic 
a 3D object. If you arent careful, there can be many 
dangerous "points" sticking out.

Rooster
26" tall x 21" long x 12" deep
November 2010


I rely on ideas popping into my head, seeing visions and
being struck by inspiration to lead me to my next project.
Roosters jumped into my awareness recently
the way frogs entered it a few years ago.
So I am following this artistic thread.
Below is a site about the symbolic meaning of roosters and other animals.

http://www.whats-your-sign.com/symbol-meanings-of-the-rooster.html

Thursday, October 21, 2010

Latest Work Aug/Oct '10

Hello again! As you can tell by the date of my last post, I havent written much lately. I have been working on new - for me - ideas.
First, I took the summer off to take a driving trip around the Southwest.
I love it there and we just meandered around,
camping and being off the grid - sort of.

But by the end of the summer I really wanted to get back to work.
I get really depressed if I dont have projects.

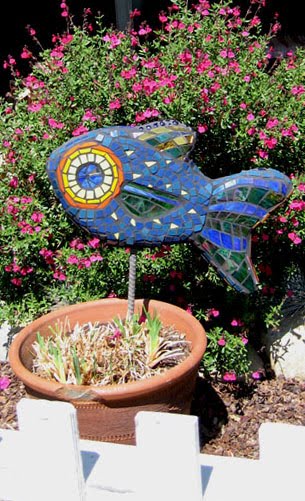
I love 3D mosaics, especially large sculptures. So I tried my hand at what I am calling "popsicles." They are shapes cut out of styrofoam, skewered on a 1/2" rebar, covered with fiberglass mesh and cement slurry, then finished with concrete. Then I used these as
substrates for mosaics. Some have the same mosaic
pattern on both sides, some are different on both sides.

These are my first attempts and are extremely imperfect.
But I am definitely on a path toward 3D mosaics and I love that!
Its a steep learning curve though.


Butterfly (popsicle)
18" wide x 16" tall x 3" deep
Stands 35" approx.
Fall 2010


Fish, side 1 (popsicle)
24" wide x 16" tall x 3" deep
Stands 28" approx.
Fall 2010


Fish, side 2 (popsicle)
24" wide x 16" tall x 3" deep
Stands 28" approx.
Fall 2010

Frog, side 1 (popsicle)
21" wide x 36" tall x 3" deep
Stands 51" approx.
Fall 2010


Frog, side 2 (popsicle)
21" wide x 36" tall x 3" deep
Stands 51" approx.
Fall 2010

Sunflower (popsicle)
20" wide x 27" tall x 4" deep
Stands 37" approx.
Fall 2010


Saturday, November 22, 2008

Mosaic Lemon Bench

My friend, Saundra Warren, and I have just completed our first project. (I've written about Saundra in a couple of previous posts) We started from scratch with just an idea and, voila, the result is this Lemon Bench. And this is Saundra hard at work.

Recently Saundra had purchased a tile saw. As you may know, nowadays when you buy a large item, it is very common for it to come encased in a styrofoam box within the outer cardboard box. Saundra had an idea for us to put that styrofoam, usually a nuisance to dispose of, to good use. We decided to turn it into a cement bench that we could then mosaic. First we covered it with strips of fiberglass mesh dipped in a cement slurry - like paper mache only using cement instead of flour. After we had totally encased the styrofoam with it, we covered it with cement. Tips and techniques on how to do this are all over the web. And it's easy and fun to do too.

Next we needed to decide where the bench would ultimately "live". I have a sweet and rustic little brick area under a lemon tree out in my backyard, so we chose that place. Saundra is an expert at taking leaves, fruit and other organic things and making ceramic tiles and molds out of them.

So we took lemon leaves and lemons from my tree, as well as ivy leaves which grow all around it, and began a long process of creating the decorations for the bench. They came out just great.

With Saundra's personal tutoring on how to get the glaze to come out just right, and after some wrestling with the kilns, our ceramic pieces were ready. We supplemented with factory tiles in various shades of white and with small hits of other color tiles too. I also created some glass and mirror butterflies on Easyboard to add sparkle. Then we grouted with Antique White to keep the crisp white look against the natural colors in the environment.

We are very happy with our first triumph. But we have learned a lot too and will put our new knowledge to use on our next project - "The Persimmon Trio". Stay tuned!

"Lemon Bench"
Kim Larson & Saundra Warren
November 2008
32" wide x 23" tall x 15" deep
Handmade tiles, factory tiles and glass

Saturday, August 2, 2008

Rock Frog, the First

Okay enough vacationing! Back to mosaics. I've been using mirror and stained glass in my mosaics from the beginning - which hasn't been very long really. But recently I have been getting sick of the man-made look of it - the shininess and the colors that aren't found in nature. And it's been getting a little too easy to do too. I've started wanting to use more earthy materials. So on vacation I gathered pebbles and rocks from the Cape Cod beaches I visited and brought them home to the West Coast.
My first attempt with them is this Rock Frog.
My vision was to juxtapose the rough, raw natural material with the refined and shiny glass. And I wanted to make it look like the frog was materializing out of the wall so I used a grout color that matched the cement color. It didn't turn out perfectly but this is an experiment for me and I will keep working on this "look". I have to admit I love working on these outdoor mosaics! I want this style of frog to be more of a surprise when the viewer comes upon it - not to be just this shiny decoration stuck to the wall but to be more of a challenge to see and understand what it is. Rock Frog 1
2008
Mirror, glass and pebbles
22" tall approximately

Wednesday, July 9, 2008

Monday, June 30, 2008

Hummingbirds and Frogs

More new work.
Nature is calling me lately and these two creatures are very popular styles.

Hummingbird Mosaic
21" x 13"
Mirror and Stained Glass

2008
Hummingbird Mosaic
22" x 13"

Mirror and Stained Glass

2008
Bill's Frog
15" x 28.5"

Mirror and Stained Glass

2008
C's Frog
15" x 28.5"

Mirror and Stained Glass

2008