Showing posts with label garden mosaics. Show all posts

Tuesday, September 3, 2013

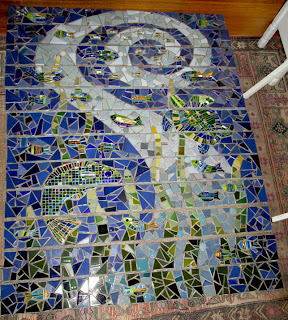
Underwater Staircase - mosaic commission

I am running with an artistic theme lately - fish, sea life and the element of water. I even started swimming again not too long ago. Well, water is a powerful force. It represents the emotional realm and, to me, imparts a feeling of moving gracefully through life.
 In July I was inspired to create some 3 dimensional mosaic fish. And then a commission came up to create a mosaic for a front staircase at a private residence in Oakland, CA. 
These clients, with only an outline of an idea, allowed me the freedom to create whatever I wanted. And the vision that came into my mind was "underwater." So I began by designing a simple sketch on the computer and had it printed out full size.
 Then I cut it out and traced it onto the Wedi board that I will mosaic onto. Each finished board will then be screwed onto the front of the stairs.
 I cut out of Wedi Board several small and one large fish, and a large turtle.  I used cement on several of these elements to round their surfaces to create a little bit of a 3 dimensional look. I mosaicked all the small elements and then laid them out on the stair cut-outs to start to get an idea of what this would look like.

 Then I began to mosaic the rest of the piece with tiles. Greens for the seaweed, dark blues for the deep water and lighter blues for the swirl in the middle.
 Each day I made significant progress and would lay out the finished pieces on my studio floor to see how it was going. It was going pretty well!
So now this part of the project is finished. I am creating two more stairs on mesh as I write this. They will complete the bottom of the stair case where the stairs are curved.
Underwater Staircase
*work in progress*
14 stairs, each 50" long

Wednesday, December 12, 2012

The Buggy Garden Mosaic - Grouting, Day 1

This is the continuing story of the mosaic mural I created for Hug A Bug Preschool in El Cerrito, California. A workshop was held on November 17th for 15 parents to each make a small mosaic insect to be incorporated into this larger mosaic work to be permanently installed on their site. 
 The install went smoothly on December 10th and the next day I arrived to begin grouting. The weather reports called for a small rainstorm to hit in the early evening so I had a feeling the grouting wouldn't be finished in one day. And I was right! 
 Grouting a mural with the type of "terrain" of this one is a difficult process. Some of the figurines stand out an inch from the base while other tessarae are very flat...some are glossy in texture while others are porous...and some tessarae are very meaningful to the individual who created the "bug". And the grout itself has to have a texture (not too thick yet not too runny) that can easily fill in all sizes and shapes of grout joints! So I knew that grouting this was going to be a slow and painstaking process. And I was right!! 
 But there is such a wonder when "the reveal" begins - the wiping away of the grout and slowly buffing each piece into a high shine!
 As expected, though, the weather took a turn for the worse - dark, damp, cold and blustery....so I stopped and will go back and finish tomorrow.
 

Sunday, December 19, 2010

"Cat In Tall Grass" Mosaic Sculpture

 Continuing my newfound interest in sculpting for mosaics 
is my latest one: "Cat In Tall Grass".


This guy is 32" tall. My initial vision was to mosaic him totally in purple glass. I love the effect of that particular color because it appears to be black until you get in into the right light. I think of it as a metaphor for so many things: you can't see it until you really look! I like much of my mosaics to be that way. You only really see them when you take time to linger and look. 


 As it turned out, I already had on hand a lot of green glass but only a little purple. So I rethought my design and decided that this guy would be hiding in the grass. He even has a bee buzzing around the back of his head!


I initially set out to create a pleasing shape that had 
popped into my head. I pretty much achieved it!

Here he is, in situ.

Cat In Tall Grass
December, 2010
Cement sculpture with glass and mirror mosaic
32" tall x 44" around x 16" wide

Tuesday, November 30, 2010

Mosaic Rooster Sculpture

I have spent the past few months learning to create cement sculptures for mosaics.
This rooster is my masterpiece so far!

He has movement and personality. Instilling those qualities into a
cement piece isnt easy. 

But diligence and practice makes perfect. Or sort of perfect.
The basic armature of all my 3D shapes has been 

styrofoam from Home Depot.
For this guy, I cut out basic shapes - for both depth 

and width - and taped them into place. The next step was to cover this 
with fiberglass mesh dredged through a slurry of cement and water. 
 The piece started to come into focus at that stage.

But the final perfecting was done with cement and Darjit. 
(Darjit is a "green" product
made of paper
that makes the cement more maleable.)
For the mosaic finishing phase I used what I had in my 
studio - glass and mirror and some marbles. Pretty simple tessarae. 
But there are many tricks to be learned about how to mosaic 
a 3D object. If you arent careful, there can be many 
dangerous "points" sticking out.

Rooster
26" tall x 21" long x 12" deep
November 2010


I rely on ideas popping into my head, seeing visions and
being struck by inspiration to lead me to my next project.
Roosters jumped into my awareness recently
the way frogs entered it a few years ago.
So I am following this artistic thread.
Below is a site about the symbolic meaning of roosters and other animals.

http://www.whats-your-sign.com/symbol-meanings-of-the-rooster.html

Thursday, February 18, 2010

Mosaics Around the House

Here are two murals I just did for a private residence in Oakland, CA.

This is "Frog Vine" and is on a small wall that juts out from the side of the house. Here is the wall "before".

I created it in my studio then adhered it to the wall in pieces.
But before grouting, I must tape off all the edges to get the clean look that I like.

That process takes hours.

This mural faces the street for passersby to see.
If you look carefully, you can see two frogs playing in the vines!
It is made of glass and tile and is 14" x 87".


The second mural was made of pieces left over from the
previous Vine At The Arbors mural installation.


Again this was created in my studio, then adhered with Thinset,
taped off, then grouted.


This is on the side of the house overlooking a garden area.

It is also made of glass and tile and is 62" x 62".

Tuesday, February 3, 2009

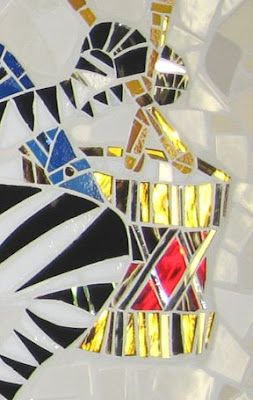
Zebra Band Mosaic!

This is my latest mosaic. It is large and heavy: approximately 4' x 3'. The zebras were first cut out of a thin Easyboard and mosaicked with stained glass and mirror.
For visual interest and surprise, some, but not all, of the glass reflects rainbow colors in the right light.

This piece was then adhered using Thinset to a thicker piece of Easyboard and mosaicked with high fire tile of varying shades of white....with yellow for the "music"!

Zebra Band
2009
Stained glass, mirror, high fire tile

Fireplace Surround Mosaic


In December '08 I received a commission to do a fireplace surround for a very nice family - the Rich's. They have a beautiful Craftsman-style house and were having a new fireplace inset installed as well as a new mantle.

The area around the inset is small - too small for traditional large tiles that are usually used on a fireplace. The area is delineated by tape in the photo above. Instead they decided on a small, simple mosaic and contacted me to do it.
Coincidentally the owners love gingko leaves and,
as you have read in previous posts, I knew the perfect artist to create them out
of ceramic tile - Saundra Warren, a Jingletown artist!

In the above photo you can see the Hardiebacker board that was put in place by the contractor. The flooring around the work area was brand new too so I took extra precautions -
like putting down newspapers, beach towels and then a tarp - to avoid damaging it. The area of the mosaic itself is only about 6 square feet and the room - the dining room - is small too.
So I felt that just a subtle, low-key mosaic was called for.

This is the almost-finished product. All it needs is the mantle to be installed.
I used mostly earthy greens but with various textures and finishes to provide visual interest. And I mixed charcoal grout with the too-bright hue of the straight-from-the-bag dark green grout to tone the color down some.

And Saundra's gingko leaves in Autumn amber and rust provide the highlights.
The mantle is due to be installed soon. I cant wait to see this piece actually finished!

Tuesday, December 16, 2008

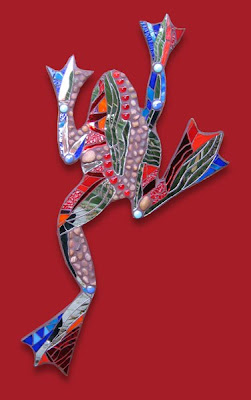
Rock Frogs, the latest

Green & Purple Frog
15" x 24"

11/08

mirror, stained glass, rocks


Red Frog
23" x 36"
11/08
mirror, stained glass, rocks

Saturday, November 22, 2008

Mosaic Lemon Bench

My friend, Saundra Warren, and I have just completed our first project. (I've written about Saundra in a couple of previous posts) We started from scratch with just an idea and, voila, the result is this Lemon Bench. And this is Saundra hard at work.

Recently Saundra had purchased a tile saw. As you may know, nowadays when you buy a large item, it is very common for it to come encased in a styrofoam box within the outer cardboard box. Saundra had an idea for us to put that styrofoam, usually a nuisance to dispose of, to good use. We decided to turn it into a cement bench that we could then mosaic. First we covered it with strips of fiberglass mesh dipped in a cement slurry - like paper mache only using cement instead of flour. After we had totally encased the styrofoam with it, we covered it with cement. Tips and techniques on how to do this are all over the web. And it's easy and fun to do too.

Next we needed to decide where the bench would ultimately "live". I have a sweet and rustic little brick area under a lemon tree out in my backyard, so we chose that place. Saundra is an expert at taking leaves, fruit and other organic things and making ceramic tiles and molds out of them.

So we took lemon leaves and lemons from my tree, as well as ivy leaves which grow all around it, and began a long process of creating the decorations for the bench. They came out just great.

With Saundra's personal tutoring on how to get the glaze to come out just right, and after some wrestling with the kilns, our ceramic pieces were ready. We supplemented with factory tiles in various shades of white and with small hits of other color tiles too. I also created some glass and mirror butterflies on Easyboard to add sparkle. Then we grouted with Antique White to keep the crisp white look against the natural colors in the environment.

We are very happy with our first triumph. But we have learned a lot too and will put our new knowledge to use on our next project - "The Persimmon Trio". Stay tuned!

"Lemon Bench"
Kim Larson & Saundra Warren
November 2008
32" wide x 23" tall x 15" deep
Handmade tiles, factory tiles and glass